Description
Render and edit tables visually in the Markdown editor: live table preview, inline cell editing, hover controls to add rows/columns, and a context menu for inserting, clearing and deleting rows/columns.
Additional Information
| Links: | |
|---|---|
| Maintainers: | eugene-lesnov |
| Version: | 0.0.1 |
| Minimum app version: | 3.5 |
| Downloads: This version: | 66 |
| Last updated: | 2026-06-20T12:38:32Z |
Visual Tables
A Joplin plugin that renders tables as real, styled tables directly inside the Markdown editor — and lets you edit them visually without leaving the editor.
Instead of staring at raw | --- | --- | syntax, you see a proper table. Click a cell to jump straight into editing, use hover controls to add rows and columns, or right-click for a full set of table operations.
Desktop only. Requires Joplin 3.5+.
Features
- Live table rendering — tables are rendered as
<table>elements inside the Markdown editor (CodeMirror 6), styled to match your Joplin theme. - Cursor-aware editing — the table a cell belongs to turns back into raw Markdown the moment your cursor or selection touches it, so it always stays fully editable as text.
- Click to edit a cell — click any rendered cell and the caret lands exactly inside that cell's Markdown source.
- Hover controls to grow the table
- + appears at the right edge to add a column;
- + appears at the bottom edge to add a row;
- controls reveal themselves contextually as the mouse approaches the corresponding edge.
- Right-click context menu with an icon toolbar:
- Insert row above / below
- Insert column left / right
- Clear cell
- Delete row / Delete column
- The clicked cell is highlighted while the menu is open so you can see what the action applies to.
- Toolbar button — an Insert table button in the Markdown editor toolbar inserts a ready-to-fill table template.
- Theme-aware styling — all colors come from Joplin editor CSS variables, so tables and menus follow your light/dark theme.
- Robust parsing — tables are detected from the editor's syntax tree (Lezer Markdown), empty cells are handled correctly, and escaped pipes (
\|) inside cells are respected.
Usage
Insert a table
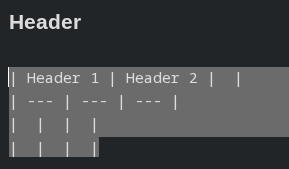
Click the Insert table button in the Markdown editor toolbar. A starter table is inserted at the cursor:
| Header 1 | Header 2 |
| --- | --- |
|  |  |
|  |  |
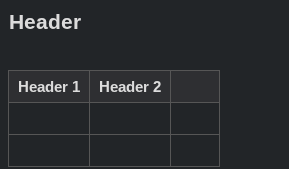
Rendering
Tables are rendered as
 →
→
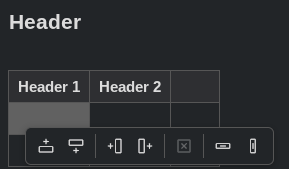
| Icon group | Actions |
|---|---|
| Rows | Insert row above, Insert row below |
| Columns | Insert column left, Insert column right |
| Cell | Clear cell |
| Delete | Delete row, Delete column |
Some actions are disabled when they would break the table (e.g. you can't delete the last column, and the header / delimiter rows can't be removed). Hover an icon to see its tooltip.
How it works
The plugin registers a CodeMirror 6 content script (ContentScriptType.CodeMirrorPlugin). It:
- finds tables via the editor's Lezer Markdown syntax tree;
- replaces each table block with a rendered widget using a
StateField-backedDecorationSet(block/replace decorations must come from a state field in CM6, not a view plugin); - skips rendering for any table that intersects the current selection, keeping it editable;
- applies edits as single CodeMirror transactions computed from positions in the syntax tree, so the underlying Markdown formatting is preserved.
The plugin only activates in the CodeMirror 6 Markdown editor. In the legacy editor it does nothing.
Installation
From the Joplin plugin repository
- Open Joplin → Tools → Options → Plugins.
- Search for Visual Tables.
- Click Install and restart Joplin.
Manual installation
- Download the latest
.jplfrom the releases. - Open Joplin → Tools → Options → Plugins.
- Use the gear/⚙ menu → Install from file and select the
.jpl. - Restart Joplin.
Building from source
npm install
npm run dist
License
MIT