Description
An agenda/calendar/schedule panel for joplin that shows all uncompleted to-dos with a due date.
Additional Information
| Links: | |
|---|---|
| Maintainers: | thescriptingguy7 |
| Version: | 4.1.0 |
| Minimum app version: | 2.9 |
| Downloads: This version: | 1065 |
| Last updated: | 2026-07-31T19:03:24Z |
Agenda
An agenda/calendar/schedule panel plugin for Joplin that shows your to-dos by when they are due, on desktop and mobile.
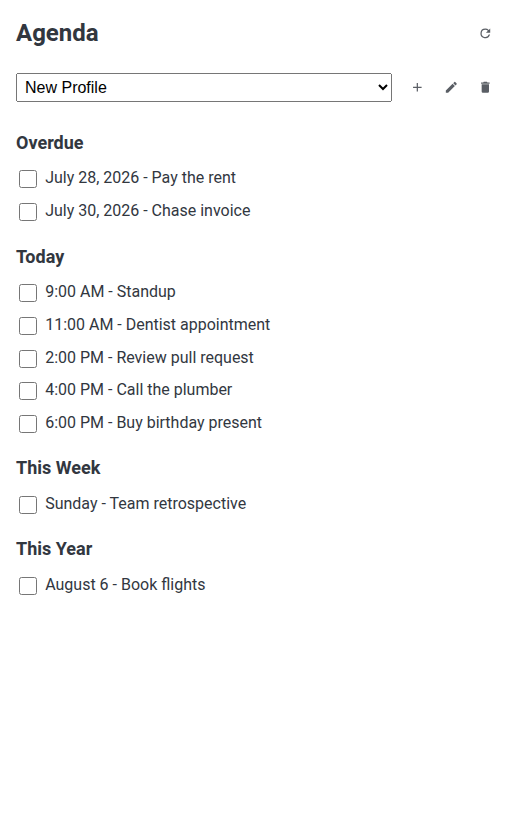
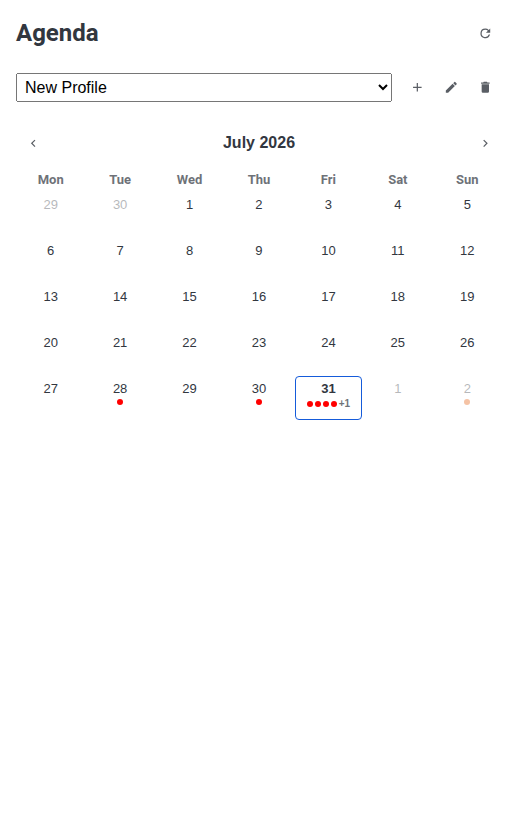
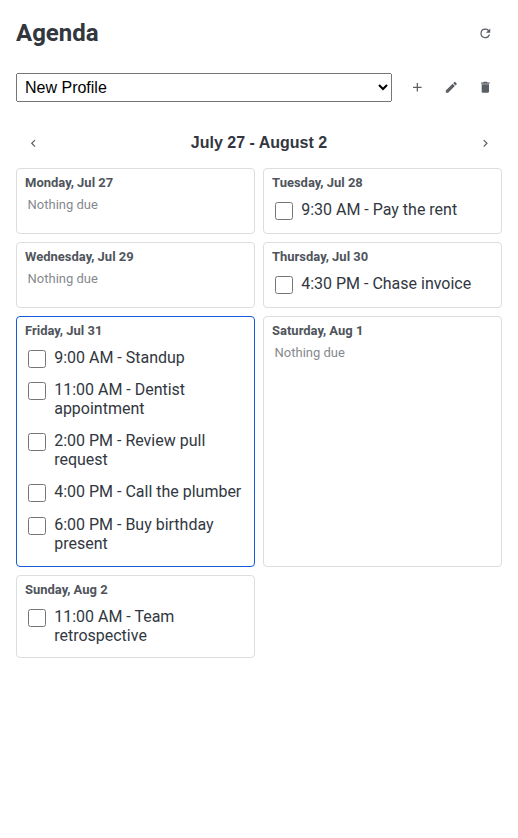
Each profile picks how its to-dos are presented, so the same panel can be a grouped list, a month calendar or a week planner.
Screenshots
| Interval list | Month calendar | Week planner |
|---|---|---|
 |
 |
 |
The screenshots are captured from a real Joplin by e2e/showcase.spec.ts; see Development to regenerate
them.
Installation
Desktop
Install it from the plugins page inside Joplin settings.
- Open Joplin
- Go to Tools -> Options in the menu bar
- Go to Plugins
- Search for "Agenda"
- Click Install
This is a fork of BeatLink's Agenda plugin and is published separately, so it installs alongside the original rather than replacing it. Profiles from an existing Agenda 3.x install are imported the first time it runs.
Mobile
Agenda runs on the Joplin mobile app from version 3.3 onwards.
- Open Joplin
- Go to Configuration -> Plugins
- Enable plugin support if it is not already enabled
- Search for "Agenda"
- Click Install
Profiles are stored per device rather than synced, so the phone starts with its own default profile. Everything else works the same as on desktop.
Usage
Agenda uses profiles to know how to sort, organize and present to-dos in the todo list. You can create many different profiles to generate the to-do lists you need. For example, you may have one profile for your work to-dos and another for your personal to-dos. You can have one for active tasks, and one for tasks being held. The only limit to the profile system is your imagination and the Joplin search system.
Creating a Profile
- To create a profile, click the plus button in the panel, beside the profile dropdown, fill out the profile options and then press create.
Editing a Profile
- To edit an existing profile, click the pencil button in the panel beside the profile dropdown, edit the profile options and then press save.
Deleting a Profile
- To delete an existing profile, click the trashcan button in the panel beside the profile dropdown, and then press delete to confirm.
Selecting a Profile
- To select a profile, use the profile dropdown list at the top of the panel.
Profile Options
Name
- In the name box, you can set the name of the profile, that's shown in the profile selection dropdown.
Search Criteria
- In the search criteria box, you can enter the search terms that Agenda will use to find tasks for this profile. Anything that you can enter in the joplin search bar, you can enter here. See the joplin search syntax for details.
Overview Note ID
- The Overview Note ID box allows you to copy all the tasks in the current profile to a new note called the Overview Note. This means that each profile in Agenda, can have a note listing all the tasks for that profile. That way, you can still have your task lists without the Agenda plugin itself. To setup the Overview Note, create a new note where you want all your tasks to be stored, and copy its note ID to the Overview Note ID box in the agenda profile options. It's important to note that Agenda will overwrite this note whenever the task list changes, so make sure you create a note specifically for this purpose and do not make changes to it or those changes will be lost.
- Every device running Agenda writes the overview notes of its own profiles. If the same overview note is configured on more than one device and both are online, each will write its own version of the note and Joplin may record a sync conflict. To avoid this, configure a given overview note on one device only.
Show Completed
- The show completed checkbox, if checked, will show tasks even if they have been completed. Otherwise, these tasks will be hidden
Show without Due Dates
- The show to-dos without due dates, if checked, will show to-dos, even if they have no due date/alarms set.
Display Format
- The display format allows you to select how the to-dos are displayed:
- Basic - A flat list, with no grouping.
- Interval - This will group to-dos according to the following categories:
- Overdue
- Today
- Tomorrow
- This Week
- This Month
- This Year
- Date - This will group to-dos by the date they are due.
- Month Calendar - A grid of whole weeks. Each day carries a dot per to-do due on it, coloured red when something is overdue, amber when it is still due and muted once everything on that day is done. A day with more to-dos than the dot limit is summarised as "+N". Select a day to list its to-dos underneath, and select it again to hide them.
- Week Planner - The seven days of a week, each listing its to-dos so you can read and tick them off in place. On a wide panel the days lay themselves out in columns.
- The two calendars can be moved backwards and forwards with the arrows, and clicking the month or week title returns you to today. Where you have navigated to is not saved: the calendar starts at today again when Joplin restarts.
- To-dos with no due date cannot be placed on a calendar. If the profile shows them, they are listed under the grid rather than being dropped.
- Overview notes are unaffected by the calendar formats. A profile set to a calendar still writes the date grouped list to its note, which stays readable and clickable where a grid would not.
Week Starts On
- Sets whether weeks begin on Monday or Sunday. This affects both calendars and the "This Week" group of the interval format.
Dots Per Day
- How many dots a day in the month calendar shows before the rest are summarised as "+N".
Date and Weekday Formats
- The date and weekday format dropdowns allow you to set how dates are shown in the panel and notes
Time Formats
- The time format checkbox allows you to switch between AM/PM or 24 hour time.
Showing and Hiding the Panel
- On desktop, click the calendar icon in the toolbar, or click the menu option under Tools -> Agenda
- On mobile, open the plugin panel dialog with the plugin button in the note screen toolbar, and select the Agenda tab
Settings
- The show profile controls checkbox toggles the create, edit and delete buttons in the panel.
- The update frequency setting controls how often Agenda refreshes as a fallback. Agenda also refreshes as soon as a note changes, a sync completes or a to-do alarm fires, so this only needs to be short if you want the interval headings (Today, Overdue and so on) to roll over quickly.
Mobile differences
Joplin's plugin API is not identical on every platform, so a few things differ on mobile:
- There is no Tools menu and no note toolbar for plugins, so the "Toggle Profile Edit Mode" and "Set Panel CSS" commands are buttons in the panel heading instead.
- Showing and hiding the panel is handled by the app rather than by Agenda.
- Profiles and the custom panel CSS are stored per device.
Development
- Download Repo
- Run
npm install - Modify code in
/src - Update Metadata in
/src/manifest.jsonand/package.json - Build plugin with
npm run dist - Run the fast checks with
npm test. These build the plugin and run it against a stubbed plugin API for both desktop and mobile, which is a lot faster than installing the plugin on a phone for every change. - Run the real-app tests with
npm run test:e2e. These download the Joplin desktop AppImage, launch it with this plugin loaded as a development plugin, and drive the genuine GUI with Playwright. They needxvfband Chromium's system libraries:
Override the Joplin version under test withsudo npx playwright install-deps chromium sudo apt-get install -y xvfb npm run test:e2eJOPLIN_E2E_VERSION. Both suites also run in CI, see.github/workflows/tests.yml. - Regenerate the README screenshots with
SHOWCASE=1 npx playwright test e2e/showcase.spec.ts, then copytest-results/showcase-*.pngover the matching files indocs/. That spec fills a month with to-dos and captures the panel in each format; it is skipped unlessSHOWCASEis set, so it costs nothing in a normal run. - Update the plugin framework with
npm run update - Publishing is done by
.github/workflows/publish.yml, which runs when a GitHub Release is published (or on demand). It takes the version from the release tag, writes it into bothpackage.jsonandsrc/manifest.json, builds, and publishes to npm. Authentication is npm trusted publishing over OIDC, so there is no npm token to keep in the repository; the package's trusted publisher must name this repository andpublish.ymlonce, on npmjs.com. The Joplin plugin repository then picks the release up from npm via thejoplin-pluginkeyword.
Notes for contributors
- Webview scripts are named
*Webview.json purpose. Webpack is configured to resolve.jsbefore.ts, so a script namedpanel.jsnext topanel.tsis silently bundled in place of the plugin module and the plugin fails to start. - The panel's markup is regenerated in full on every refresh, so nothing stateful can live in the webview. The calendar
views keep which month or week is on screen in
panel.tsand reach it through messages, the same way the profile dropdown does. - A display format returns markdown from
getTodos()and, optionally, different markup fromrenderHtml(). The calendar formats override only the latter, which is why they still write a sensible overview note. - Node modules such as
fs-extraandsqlite3are only available throughjoplin.requireon desktop. UserequireNodeModulefromsrc/core/platform.ts, which returns null when the module is unusable, and keep anything that depends on it optional. - To test on mobile without a phone, install the built
publish/*.jplinto the web build of the mobile app under Configuration -> Plugins -> Advanced -> Install from file. - Two things in the desktop app are out of reach of the e2e tests, because they are native Electron windows rather than
part of the renderer: the Tools -> Agenda menu (and the command palette) and the confirmation shown when deleting a
profile. The commands behind them are covered by
npm testinstead. - Joplin brings its search index up to date on a timer of its own, so a to-do that was just created does not appear in a search straight away. Anything in the tests that waits for the panel to reflect a change needs a generous timeout, and the suite is configured to retry a failed test once because that timing gets worse when the machine is busy.