Description
Calendar plugin for Joplin
Additional Information
| Links: | |
|---|---|
| Maintainers: | volodymyroliinyk |
| Version: | 1.8.2 |
| Minimum app version: | 3.3 |
| Downloads: This version: | 425 |
| Last updated: | 2026-09-11T01:31:53Z |
🗓️ My Calendar for Joplin




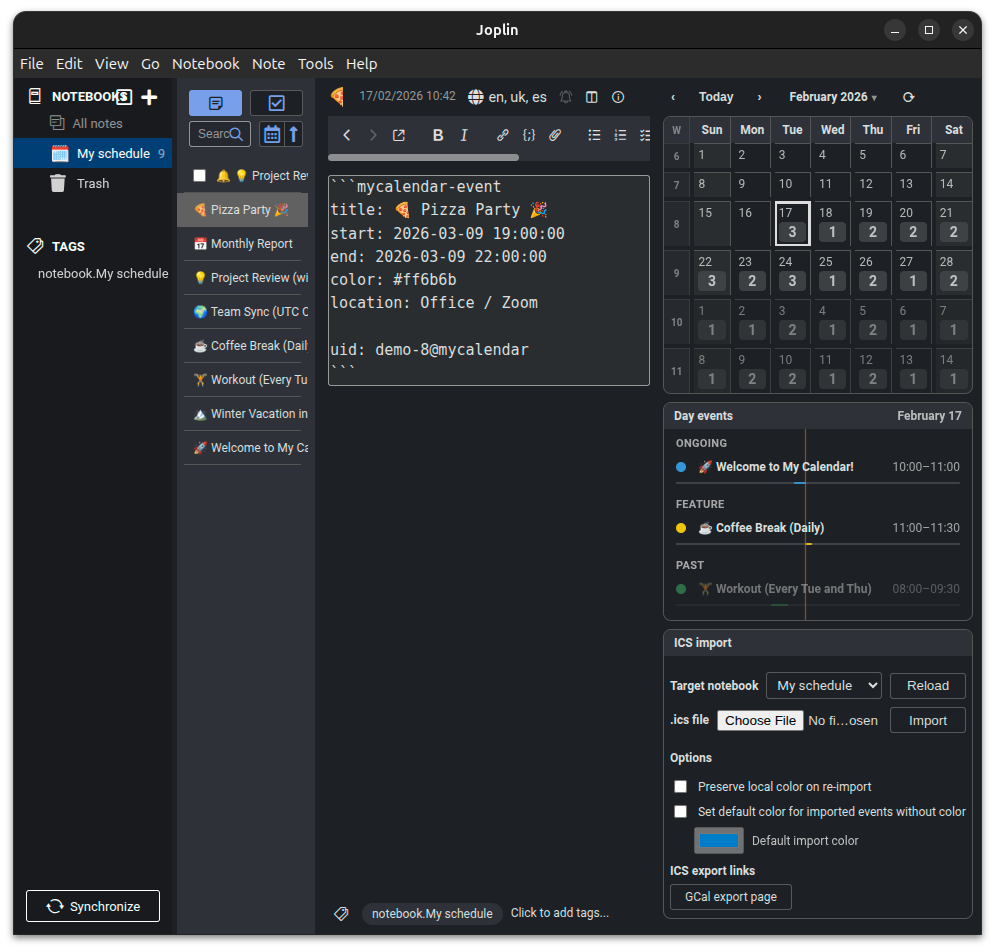
My Calendar adds a calendar panel to Joplin. Events are stored as regular Joplin notes, so they stay with your notes and use your normal Joplin sync.
| Light mode | Dark mode |
|---|---|
 |
 |
Features
- Month calendar with colored events, alarm markers, quick month and year selection, week numbers, and Monday or Sunday as the first day of the week.
- Day list with current, future, and past events. Completed Joplin Todo events are dimmed and marked with a check.
- Event timeline and 12-hour or 24-hour time display.
- Click an event to open its Joplin note.
- Create events from a form in the calendar panel, with field checks and searchable Joplin tags.
- Create events by adding a
mycalendar-eventblock to any note. - Store more than one event in the same note.
- Daily, weekly, monthly, and yearly repeats.
- All-day events, timezones, locations, descriptions, colors, and excluded repeat dates.
- Manual ICS file import on desktop.
- Scheduled ICS import from HTTPS links on desktop.
- Optional Joplin Todo reminders from ICS alarms.
- Toolbar buttons to clear the event cache and run scheduled imports now.
- Light and dark theme support.
- Desktop and mobile support for the calendar and event form.
Platform support
| Feature | Desktop | Mobile |
|---|---|---|
| Calendar and day list | ✅ | ✅ |
| Create events | ✅ | ✅ |
| Plugin settings | ✅ | ✅ |
| Manual ICS file import | ✅ | ❌ |
| Scheduled ICS import from HTTPS URLs | ✅ | ❌ |
| External ICS export links | ✅ | ❌ |
| Create Todo reminders from ICS alarms | ✅ | ❌ |
Reminder notes created on desktop can sync to mobile and use Joplin's normal mobile notifications.
Install
My Calendar requires Joplin 3.3 or later.
- Open Joplin.
- Go to Tools > Options > Plugins on Windows/Linux or Joplin > Settings > Plugins on macOS.
- Search for My Calendar.
- Select Install, then restart Joplin.
On desktop, use Toggle My Calendar from the View or Tools menu to show or hide the panel. The default shortcut is
Ctrl+Alt+C. On mobile, open the plugin from Joplin's plugin menu.
Create an event
Use the form
- Open the My Calendar panel.
- Find Add event note.
- Choose a notebook.
- Enter the event details.
- Select Create.
The plugin creates a Joplin note, adds the selected tags, opens the note, and refreshes the calendar.
The form supports timed and all-day events, timezones, colors, locations, descriptions, searchable tags, repeats, repeat end dates, weekdays, month days, and excluded dates. It highlights invalid fields before creating the note.
Add an event block to a note
Add a fenced block like this to any note:
```mycalendar-event
title: Meeting with Team
start: 2026-02-04 10:00+02:00
end: 2026-02-04 11:30+02:00
color: #3498db
location: Conference Room B
```
Only start is required. If title is missing, the note title is used.
You can keep normal text before and after the block. You can also add several event blocks to one note. See the examples folder for all-day, recurring, timezone, and multi-event notes.
Event fields
| Field | What it does | Example |
|---|---|---|
start |
Event start. Required. | 2026-02-04 10:00+02:00 |
end |
Event end. | 2026-02-04 11:30+02:00 |
title |
Event name. Uses the note title when empty. | Team meeting |
description |
Extra text shown in the day list. | Review the current work |
location |
Event location. | Conference Room B |
color |
Event color in #RGB or #RRGGBB form. |
#3498db |
tz |
IANA timezone for a time without an offset. | America/Toronto |
all_day |
Marks an event as all-day. | true |
repeat |
Repeat rule: daily, weekly, monthly, or yearly. | weekly |
repeat_interval |
Repeat every N days, weeks, months, or years. | 2 |
repeat_until |
Last date or time in the repeat series. | 2026-12-31 |
byweekday |
Days for a weekly repeat. | MO,WE,FR |
bymonthday |
Day of the month for a monthly repeat. | 15 |
exdate |
Excludes one date from a repeat. Can be repeated. | 2026-03-04 |
valarm |
Alarm data imported from ICS. | {"trigger":"-PT15M"} |
uid |
Stable source ID. Usually managed by the plugin. | event-123 |
recurrence_id |
ID of one changed repeat occurrence. | 20260304T100000Z |
uid, recurrence_id, and valarm are mainly used by ICS import. You normally do not need to add them by hand.
Dates and timezones
Use one of these forms:
start: 2026-02-04 10:00+02:00
The UTC offset makes the time clear on every device.
start: 2026-02-04 10:00
tz: America/Toronto
The IANA timezone applies the correct daylight-saving rules.
start: 2026-02-04 10:00
Without an offset or tz, the value is a local floating time and is shown as written.
Import ICS calendars
ICS import is available on desktop.
- Open the My Calendar panel.
- In ICS import, choose the target notebook.
- Choose an
.icsfile. - Select Import.
The importer supports common files from Google Calendar, Outlook, Apple Calendar, and other calendar apps. It handles all-day events, timezones, repeats, excluded dates, changed or cancelled occurrences, descriptions, colors, and alarms.
When you import the same calendar again, the plugin uses event IDs to update existing notes instead of creating copies. Text outside the managed event block is kept. You can also choose whether a local event color should be kept.
Scheduled import
On desktop, the plugin can download and import ICS files from HTTPS URLs. Add pairs in My Calendar settings:
https://example.com/calendar.ics | Work ;; https://example.com/home.ics | Personal
;; separates entries. | separates the URL from the exact notebook title. The interval can be set from 5 to 1440
minutes. Use the download button in the calendar toolbar to run all scheduled imports now.
ICS alarm reminders
ICS alarms can be turned into Joplin Todo notes on desktop. You can set:
- whether alarm import is enabled;
- how many days ahead to create reminders;
- the emoji or short prefix used in reminder titles.
Re-importing the calendar updates its reminder notes. Reminder notes from other imported calendars are not changed.
External export links
The desktop settings can add buttons that open external calendar export pages:
Google Calendar | https://example.com/export ;; Work Calendar | https://example.com/work
These are shortcuts to websites. The plugin does not upload your notes or calendar data to them.
Settings
Open Tools > Options > My Calendar on Windows/Linux or Joplin > Settings > My Calendar on macOS.
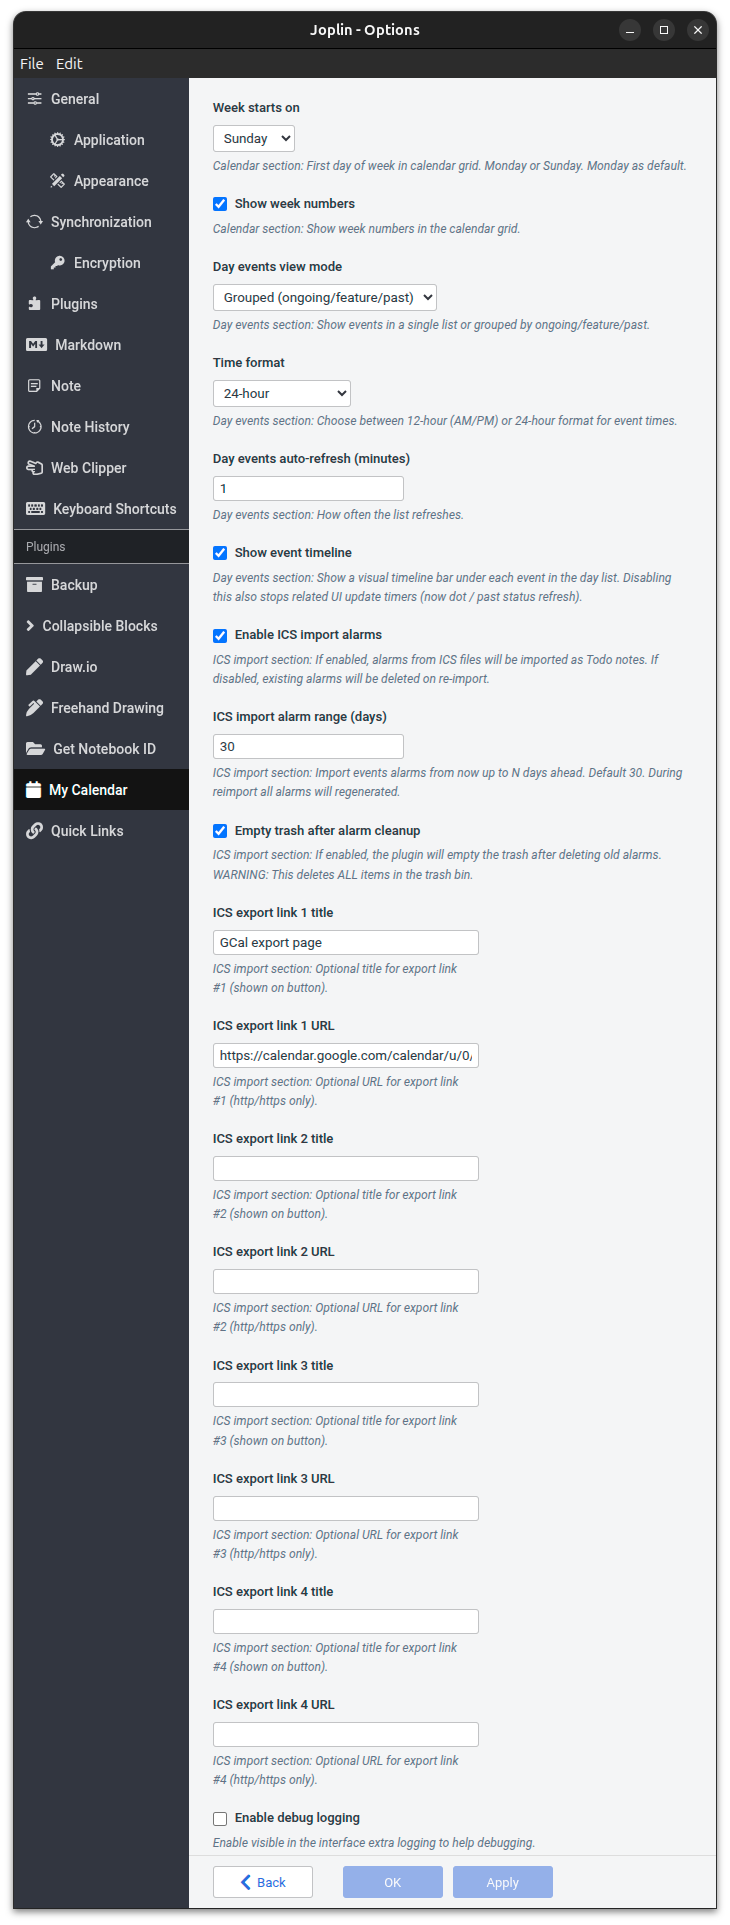
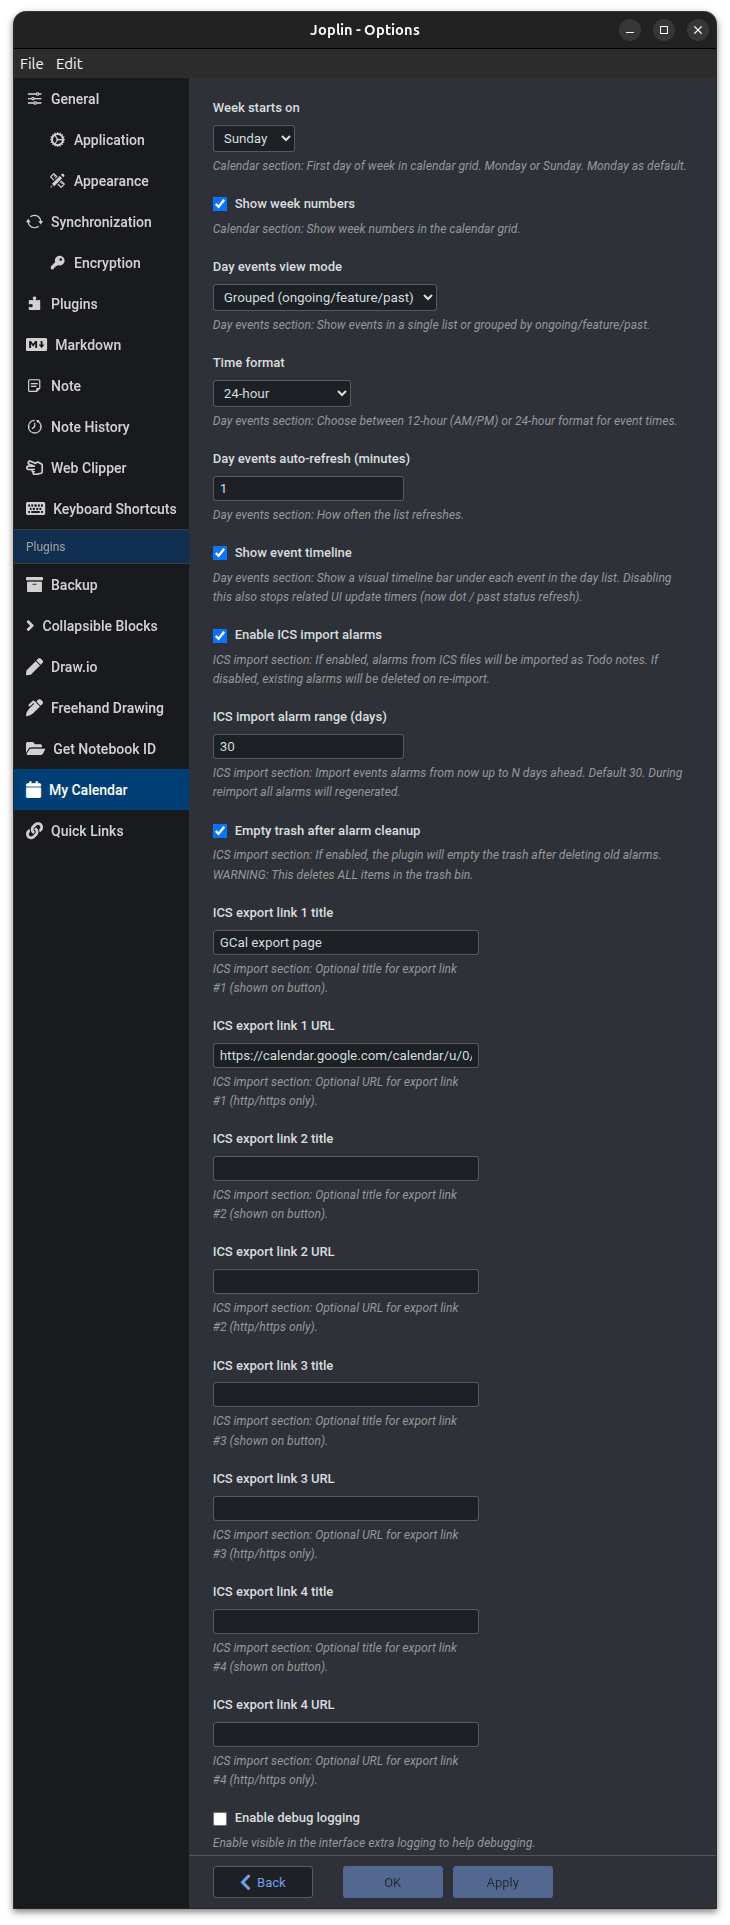
- Calendar: first day of the week and week numbers.
- Day events: single or grouped list, completed Todo markers, 12/24-hour time, refresh interval, and timeline visibility.
- Colors: default event colors and current-time line colors for light and dark themes.
- ICS import (desktop): alarms, reminder range, reminder prefix, scheduled imports, and external export links.
- Developer: extra logs in the panel and console.
Color settings accept #RGB and #RRGGBB.
| Light theme | Dark theme |
|---|---|
 |
 |
Privacy and safety
- Events stay in Joplin notes.
- The plugin uses Joplin sync and does not need its own server.
- Scheduled ICS import connects only to the HTTPS URLs you add.
- Event text is cleaned before it is shown in the panel.
- External links are limited to HTTP and HTTPS addresses.
Development
Project structure
src/main/: plugin backend, parsers, services, settings, views, and the UI bridge.src/ui/: JavaScript and CSS for the calendar panel.src/index.ts: plugin entry point.tests/: Jest tests arranged to match the source folders.examples/: sample event notes and ICS files.dist/andpublish/: generated build output. Do not edit them by hand.
Commands
npm install
npm run build
npm run build:jpl
npm test
npm run test:stable
npm run test:watch
npm run lint
npm run buildbuildsdist/index.js.npm run build:jplcreates the.jplpackage inpublish/.npm testcleans old Jest workers, runs the test suite, and retries once in serial mode after a workerSIGSEGV.npm run test:stableruns Jest serially from the start.npm run test:watchruns Jest in watch mode.npm run lintchecks source and test files.
Automation scripts
scripts/pre-pack.sh
Runs lint with no warnings allowed, runs the stable test suite, and builds the package. It also creates the npm tarball. Security fixes are opt-in.
npm run pre-pack
npm run pre-pack -- --audit-fix
scripts/deploy-and-restart-joplin-dev.sh
Builds the plugin, copies the .jpl file to the local snap installation, restarts Joplin, opens Joplin DevTools, and
opens Chromium at chrome://inspect/#devices.
bash ./scripts/deploy-and-restart-joplin-dev.sh
This script is specific to the Linux/X11 workstation where its menu coordinates were captured. It requires snap Joplin,
xdotool, xprop, and Chromium. It closes the current Joplin session and replaces the installed development copy of
the plugin.
Test helpers
scripts/run-tests.shcleans stale Jest processes and retries a crashed parallel run once with--runInBand.scripts/cleanup-jest.shremoves stale Jest workers for this repository.scripts/check-tests.shchecks that the latest successful test run is no more than one hour old.
Release helpers
scripts/release.sh [patch|minor|major]validates GitHub and npm access, versions the package, builds it, creates the GitHub release, and publishes the npm tarball.scripts/preview-changelog.sh [patch|minor|major]previews generated release notes without changing files.scripts/update-demo-ics.pymoves dates in the demo ICS file forward for screenshots and testing.
See the Development Workflow Guide for branch names, commit messages, and releases.
Contributors
- Volodymyr Oliinyk (@volodymyroliinyk) — creator and maintainer.
- Oleksii Voznosymenko (@vlexz) — contributed collapsible "Add event note" and "ICS import" sections (#167).
Support
If My Calendar is useful to you, you can support its development with PayPal.
Changelog
See CHANGELOG.md for release notes.
License
Copyright (c) 2024-2026 Volodymyr Oliinyk.
Licensed under the MIT License.